Side-by-side presentation and video
Well, it was a nice idea I believe, to place a video side-by-side with a Powerpoint (or one of it's inferior Open Source clones) presentation. The idea came when my boss showed me Microsoft Producer, which does exactly this (it's nice to have people who at least pay some attention to non-Open Source, especially when he pays you.).
Producer is a plugin for Powerpoint, with a simple User Interface, which involves importing a presentation, and a video. Setting the timings for the slides, placing them adjacently in an output it video.
It sounds simple enough, and I thought this functionality would be possible in some of the Open Source video editing equipment, but either: I knew for a fact that the software didn't have the capability, or: the software was impossibly difficult to use.
So, I had a think, and a play, and another play, and I came up with the plan:
FFmpeg is a universal encoder-toolbox, and although it has most of the good functionality disabled in standard distributions, you can rebuild it to be able to deal with most files. When running Ffmpeg, you choose an input file, set some options for it, and choose an output file, and set options on it, and it converts between the two. Pretty amazing.
This is an example command:
This splits myvid.avi into its frames and its audio track. The frame names are specified as the frames/%09d.png formatting string. In our case, we place the frames in a directory called frames.
Amazingly, the filenames is all Ffmpeg needs to work out what is what. It understands that if it is going to output to a filename like the format string for frames, that it should use the png encoder, and place the files there. It knows that because I also gave a wav filename, that the audio output should go there.
The -r option sets the frame rate. Setting -r before and after the input file is a bit weird, but the first -r applies to the input file, and the second -r applies to the output file (in this case the png frames). This ensures that the frames come out at the correct frame rate, so that we can be vaguely sensible about recombining them later. Essentially, you should decide at this point what you want your final frame rate to be, since from this point onwards you will be stuck with whatever you use.
Well, using open office across the UNO bridge with Python was a fairly painful task, considering how simple it could be. Openoffice will export a slide to a Jpeg, and it does it quite reasonably, however, there seems no way in which you can tell it to export more than one slide, or even which slide to export. I hope I am wrong about this, and so can refactor this hideous hack:
Some pseudo code:
It's pretty awful, I know, and very slow, and when you add on to that the fact that you have to somehow spawn a headless Open Office server instance to communicate with, it can get a bit muddled. But stick to your guns.
So you have the frames from the video in a directory, and you have one frame for each slide in a presentation. To create the new image, we will need to know which slide applies to which particular frame of the video. We need a list of timings, those are the times when the slides change.
Now, since we know our frame rate is 25 frames per second, we can calculate exactly which slide should be placed against which video frame, and we should do it. I used PIL (Python Imaging Library) for this task because it was the first library I thought of. I actually did a similar thing using ImageMagik, but not spawning a new process for each operation was better.
So, using PIL, and say we want a final video that is 640x320, with the presentation and video each occupying half of the picture, we should create a frame for each of the frames in the original video.
Now, we left get_slide_for_time up to your imagination, but you can imagine. We open each file, and "paste" them onto the target file. Then we save the file with the same file name in a different directory. This will really help us when we are reencoding the whole thing, since it is the syntax ffmpeg already knows.
So we have a directory of files which are the final frames, we have a framerate that we have stuck to, we have an audio track, and we want an output file.
So again using Ffmpeg:
This time we specify two input files, one of which is actually a file mask, and it encodes them into the resulting video. Don't forget to tell it the frame rate of the frame images (that's the first parameter), and to set an audio rate. The output file we selected is a Flash Video, which is easy to play online.
Then we write a script that does this for us. Which I have done, and it does everything I personally need it to. And you can see it at The Google Code Project Page. There is also a brief summary of how to use it there.
This could be a useful educational tool. The problem of recording lectures with presentations when you have to zoom the camera in on the screen is just nasty.
Edit: the world needs more screenshots, a variation on what we can do:
Producer is a plugin for Powerpoint, with a simple User Interface, which involves importing a presentation, and a video. Setting the timings for the slides, placing them adjacently in an output it video.
It sounds simple enough, and I thought this functionality would be possible in some of the Open Source video editing equipment, but either: I knew for a fact that the software didn't have the capability, or: the software was impossibly difficult to use.
So, I had a think, and a play, and another play, and I came up with the plan:
- Split the presentation into images: 1 slide per file
- Split the video into frames of png files, and save the sound for later
- And for each frame:
- Create a new image with the video frame, and the slide frame placed next to eachother.
- Join all the frames to make a new video, with the sound.
FFmpeg is a universal encoder-toolbox, and although it has most of the good functionality disabled in standard distributions, you can rebuild it to be able to deal with most files. When running Ffmpeg, you choose an input file, set some options for it, and choose an output file, and set options on it, and it converts between the two. Pretty amazing.
Stage 1: Converting a video into frames:
This is an example command:
ffmpeg -r 25 -i myvid.avi -r 25 -s 320x240 frames/%09d.png audio.wav
This splits myvid.avi into its frames and its audio track. The frame names are specified as the frames/%09d.png formatting string. In our case, we place the frames in a directory called frames.
Amazingly, the filenames is all Ffmpeg needs to work out what is what. It understands that if it is going to output to a filename like the format string for frames, that it should use the png encoder, and place the files there. It knows that because I also gave a wav filename, that the audio output should go there.
The -r option sets the frame rate. Setting -r before and after the input file is a bit weird, but the first -r applies to the input file, and the second -r applies to the output file (in this case the png frames). This ensures that the frames come out at the correct frame rate, so that we can be vaguely sensible about recombining them later. Essentially, you should decide at this point what you want your final frame rate to be, since from this point onwards you will be stuck with whatever you use.
Stage 2: Convert a presentation to a set of frames.
Well, using open office across the UNO bridge with Python was a fairly painful task, considering how simple it could be. Openoffice will export a slide to a Jpeg, and it does it quite reasonably, however, there seems no way in which you can tell it to export more than one slide, or even which slide to export. I hope I am wrong about this, and so can refactor this hideous hack:
Some pseudo code:
open the presentation and count pages
for each page:
open the presentation
delete all pages except the page we want
export the page
It's pretty awful, I know, and very slow, and when you add on to that the fact that you have to somehow spawn a headless Open Office server instance to communicate with, it can get a bit muddled. But stick to your guns.
Stage 3: Creating a new image from the frames
So you have the frames from the video in a directory, and you have one frame for each slide in a presentation. To create the new image, we will need to know which slide applies to which particular frame of the video. We need a list of timings, those are the times when the slides change.
Now, since we know our frame rate is 25 frames per second, we can calculate exactly which slide should be placed against which video frame, and we should do it. I used PIL (Python Imaging Library) for this task because it was the first library I thought of. I actually did a similar thing using ImageMagik, but not spawning a new process for each operation was better.
So, using PIL, and say we want a final video that is 640x320, with the presentation and video each occupying half of the picture, we should create a frame for each of the frames in the original video.
import os
import Image

for i, file_name in enumerate(os.listdir('frames')):
    frame_path = os.path.join('frames', file_name)
    new_image = Image.new('RGBA', (640, 320)) # Make a new image 640x320
    frame_time = i * 25 # Where are we in the video
    slide_path = get_slide_for_time(frame_time) # Get the frame for the time
    slide_image = Image.open(slide_path) # Open the slide file
    video_image = Image.open(frame_path) # Open the video frame file
    slide_image.resize((320, 240), Image.ANTIALIAS) # Resize to the target size
    video_image.resize((320, 240), Image.ANTIALIAS)
    new_image.paste(slide_image, (0, 0)) # Put each iamge on the new target image
    new_image.paste(video_image, (0, 320))
    new_image.save(os.path.join('output_frames', file_name)) # Save the file
Now, we left get_slide_for_time up to your imagination, but you can imagine. We open each file, and "paste" them onto the target file. Then we save the file with the same file name in a different directory. This will really help us when we are reencoding the whole thing, since it is the syntax ffmpeg already knows.
Stage 4: Reencoding the whole thing
So we have a directory of files which are the final frames, we have a framerate that we have stuck to, we have an audio track, and we want an output file.
So again using Ffmpeg:
ffmpeg -r 25 -i output_frames/%09d.png audio.wav -ar 44100 myvideo.flv
This time we specify two input files, one of which is actually a file mask, and it encodes them into the resulting video. Don't forget to tell it the frame rate of the frame images (that's the first parameter), and to set an audio rate. The output file we selected is a Flash Video, which is easy to play online.
Then what?
Then we write a script that does this for us. Which I have done, and it does everything I personally need it to. And you can see it at The Google Code Project Page. There is also a brief summary of how to use it there.
Thoughts
This could be a useful educational tool. The problem of recording lectures with presentations when you have to zoom the camera in on the screen is just nasty.
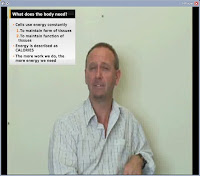
Edit: the world needs more screenshots, a variation on what we can do:

